You are using an out of date browser. It may not display this or other websites correctly.
You should upgrade or use an alternative browser.
You should upgrade or use an alternative browser.
SCX20
- Thread starter Pthein
- Start date
Pthein,
When you are setting up a NAVPILOT711C, you must configure the 1st, 2nd, and 3rd Heading Selection (along with the Position Selection...) and tell what priority you want to use for the autopilot. If you already have a PG700 and GP330B in the system, these are probably the devices that are currently supplying both your primary Heading and Position.
If you were to add a SCX20 you'll have to add this as a device to the NAVPILOT711C Installation Settings as one of the 1st, 2nd, or 3rd Heading Sensor and Position Sensor. The NAVPILOT711C will not automatically select it. :noway
Please keep in mind that when using the SCX20, you'll have to set-up this unit using either a NAVPILOT300, or a TZT2 (with Version 7 Software), or a TZT3. Or you can use the SCX20 Set-up Tool with a PC using a proper 2000 interface.
For the SCX21, you can set up this unit with a GP39, or Set-up Tool with a PC and a proper NMEA0183 interface.
-Deep Blue
VERY good questions MikeK ! Someone is really thinking. For a just a little more $, I personally would go with the newest tech. The SCX20 is the cats meow. Because it doesn't have to deal with magnetic interference like a flux gate does, the performance is much better and there is no compensation time on turns resulting in the radar overlay having little or no skewing. ARPA is better, pilot is better, and heading is better because of it. What really adds to the many benefits is that the TZT3 internal sounder DOES support heaving control. :cool
Correct. You should be a marine tech because you have a great mind for this.
Just received an SCX20 and am installing it using the roof mount adapter on a buggy top. Installation looks pretty straightforward but I have an "Attachment gasket" 20-040-1106-0 in the package I cannot find a reference to in any of the installation methods. It fits very well into the recess on the roof mount base on the topside between the compass and base but doesn't completely close the gap (without adhesive).
I just wanted to make sure I was not missing a step!
Thanks!
Bill
Lightning Yachts
I just wanted to make sure I was not missing a step!
Thanks!
Bill
Lightning Yachts
Ron Micjan
New member
I would leave the other devices and use them for backup. Set the SCX20 as the primary device and the gp and pg as secondary.
Bill106":2f1pgu6t said:Just received an SCX20 and am installing it using the roof mount adapter on a buggy top. Installation looks pretty straightforward but I have an "Attachment gasket" 20-040-1106-0 in the package I cannot find a reference to in any of the installation methods. It fits very well into the recess on the roof mount base on the topside between the compass and base but doesn't completely close the gap (without adhesive).
I just wanted to make sure I was not missing a step!
Thanks!
Bill
Lightning Yachts
Where did you find one available?
Quitsa
Furuno Super Fan
mikek":srcne7ts said:Bill106":srcne7ts said:Just received an SCX20 and am installing it using the roof mount adapter on a buggy top. Installation looks pretty straightforward but I have an "Attachment gasket" 20-040-1106-0 in the package I cannot find a reference to in any of the installation methods. It fits very well into the recess on the roof mount base on the topside between the compass and base but doesn't completely close the gap (without adhesive).
I just wanted to make sure I was not missing a step!
Thanks!
Bill
Lightning Yachts
Where did you find one available?
It's for my boat. Bill's an OEM/boat builder who ordered the unit as soon as it was possible to do so and got it from his Furuno distributor, not a dealer. The SCX20 has definitely started shipping so with a bit of effort checking around, you should be able to find one.
Are you talking about this Gasket? (Pg 1-19 of the manual)

Here is a link to the packing list. I don't see any other gasket.
https://furunousa.com/-/media/sites/fur ... _scx20.pdf
The gap you ask about around where the SCX20 and the base meet up is normal. It drains through this mount. (but not down the middle hence the gasket for the center cable to seal that area). You will see the normal gap shown on the product page photo.
https://furunousa.com/en/products/SCX20
In regards to the availability; yes they are being sold and can be ordered from your Furuno dealer. A very hot product for 2020 season so give yourself a little lead time.
Thank you for your reply Johnny Electron!
I'm probably overthinking this installation but Quitsa would mercilessly (and justifiably!) pick on me if I blew the installation of all his new Furuno equipment.
The gasket I was referring to is item #4 on the packing list, part # 100-429-870-10
I get that the roof mount gasket, #100-429-691-10, with sealant applied per instructions will seal the joint between the base and the surface it's installed on. What I was concerned about is the space between the base and the SCX20 itself surrounding the cable inlet which has about a 4mm gap. That gap exposes both the cable and more importantly, the hole the cable leads down into the boat, to the elements. Granted at the locations most SCX20's will be installed solid water ingress is not expected but being a boat, I always try and plan for the unexpected.
The Attachment Gasket is actually slipped over the bottom of the roof mount gasket in your picture and was in our new kit as well. Being naturally curious I looked through all the different installation methods to see where it might be called for but couldn't find any. I noticed it is a perfect fit on the top of the roof mount base and thought that might be it's intended usage. With sealant applied generously it would complete the seal on both the cable connector and the cable path down into the boat and as far as I can tell, not impede the drainage of any spray that might enter the base.
The manual covers different installation methods the antenna can be mounted. You want to ensure you are following the right method for the one you have chosen.
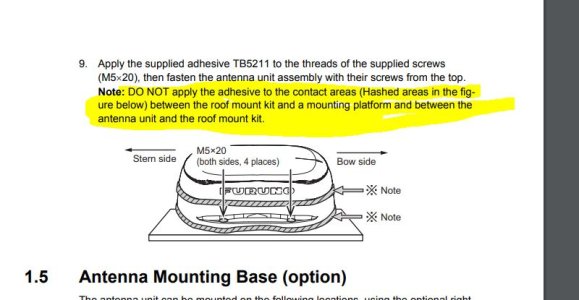
If using the roof mount kit base, it needs to vent and NOT be sealed up with a lot of sealant. If sealed it will become a water catch for condensation and rain. The gasket (Item four from packing list) 100-429-870-10 goes onto the cable as shown in the manual so that the cable can seal up well with the base. You don't want water running down the hole. You will apply a little sealant to the top of this attachment gasket so it seals well to the base on the underside. You do NOT want to block any vent holes. This unit needs to breathe. Sealed items will condensate when things heat up and cool down. The base itself is only screwed down to the top but you do put a little sealant on the treads of the screws (step 9 page 1-10).

You do NOT want to seal the base or where the base and the SCX20 meet. This area has a gap to breathe. The gap will be like is show in the photo of the product page.
https://furunousa.com/en/products/SCX20
If using the roof mount kit base, it needs to vent and NOT be sealed up with a lot of sealant. If sealed it will become a water catch for condensation and rain. The gasket (Item four from packing list) 100-429-870-10 goes onto the cable as shown in the manual so that the cable can seal up well with the base. You don't want water running down the hole. You will apply a little sealant to the top of this attachment gasket so it seals well to the base on the underside. You do NOT want to block any vent holes. This unit needs to breathe. Sealed items will condensate when things heat up and cool down. The base itself is only screwed down to the top but you do put a little sealant on the treads of the screws (step 9 page 1-10).

You do NOT want to seal the base or where the base and the SCX20 meet. This area has a gap to breathe. The gap will be like is show in the photo of the product page.
https://furunousa.com/en/products/SCX20
Thank you again Johnny,
I am sorry if I gave the impression I was referring to sealing up any of the drain holes, I understand why they are there and didn't mean to imply that!
The pictorals in both the manual and addemdum flyer both show the distinctive shape of the roof mount gasket and it fits in the recess on the bottom of the roof mount base perfectly with the "nipple" going into the 25mm hole in the boat's mounting. That all makes perfect sense and is clearly conveyed.
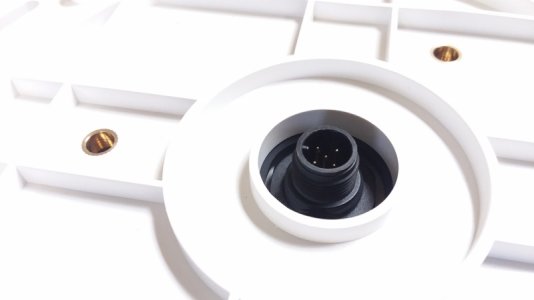
What I was referring to was the gap between the base and the antenna where the "attachment gasket" also fits perfectly. With a generous dollop of sealant on both sides that will complete the seal only surrounding the cable mount on the antenna and not jeopardize any vent holes. My main concern was any moisture in between the base and antenna draining down into the boat's hardtop wire chases and then down through the pipework into the interior.
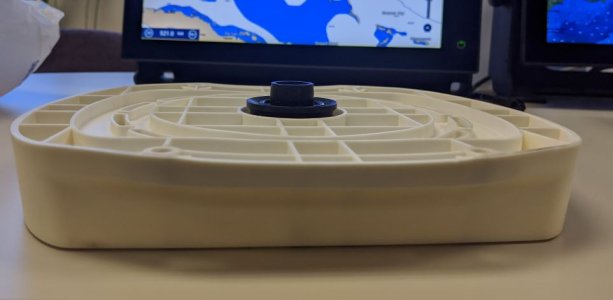
I attached a picture the gasket and what I am referring to.
Thank you again for your help!
Bill
Attachments
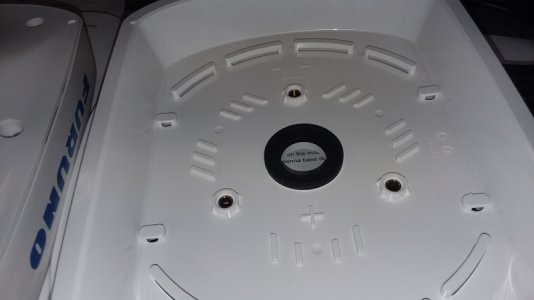
I had to scratch my head looking at your photo. These units are very hot seller so I don't even have a production unit to refer to. I think I see what is wrong with yours. It appears you are putting the gasket on the inside of the mount (in the correct orientation) but it should be put on the underside of the mount (not inside). Here is a photo of a pre-production unit with the mount "upside down". The bulk of the gasket sticks out going down with the cable. The gasket will push down and seal tight on the hard top once mounted. (almost like a toilet plunger)

When all put together any water getting in between the unit and the mount (as it is expected) will run out the drain holes because they are the lowest point inside of the mount. There won't be much and you can always test it with a water hose after you complete the install. What little water might get in there will drain off from underneath and the edges. The seal will seal up the cable and the hole that was drilled. It should keep any water out from going down the cable run. It say to put some sealant on the top and underside of the gasket. When the seal meets the hardtop it should have a light plunger effect and the sealant will also dry creating a bond. With that seal in place it should require you to push down on the mount to collapse/compress it onto the hard top.

When all put together any water getting in between the unit and the mount (as it is expected) will run out the drain holes because they are the lowest point inside of the mount. There won't be much and you can always test it with a water hose after you complete the install. What little water might get in there will drain off from underneath and the edges. The seal will seal up the cable and the hole that was drilled. It should keep any water out from going down the cable run. It say to put some sealant on the top and underside of the gasket. When the seal meets the hardtop it should have a light plunger effect and the sealant will also dry creating a bond. With that seal in place it should require you to push down on the mount to collapse/compress it onto the hard top.
Thank you again Johnny for your response,
Your pre production unit is exactly the same as the one I received and the roof top gasket only really fits the way you showed it in your picture. I tried to upload that pic but couldn't but it's the same.
:lol:
The open hole I was attempting to describe is on the top side of the roof top bracket where there would be a gap between the bracket and the antenna. The supplied, but not referenced, gasket would go a long way towards closing that possible ingress point. I will build more detailed pics tomorrow.
It all goes together before the base is screwed down. I would love to see photos. Being one of the first, you can show the rest of us how one looks installed. 
I will to try to document it thoroughly! Please stop me if I stray too far! I'm replacing a full spread of the latest Garmin gear with two TZT3 -16's, a TZTL-12, DRSANXT- 25 200 watt solid state radar, DFF3D, B59, a pair of B175 transduces to an existing NMEA network with Airmar weather sensor, DIgital AIT5000 AIS, ICOM 506, Standard 2250, multiple fluid level sensors, two Cummins diesels using SBMAR instruments and Twin Disc EC-300's. The physical installation is really not worrying me nearly as much as getting all the different manufacturers electronics talking together!
Sounds like a sweet setup. It should rock when finished. Sooooo Sweet.
Similar threads
- Replies
- 6
- Views
- 636
- Replies
- 4
- Views
- 562


