FCV-1150 connections

Just purchased an FCV 1150 with an Airmar CM599C-LH transducer. Can't seem to figure out how to connect them together.

What should the HF and LF jumpers (I guess its called "tap setting") be positioned in? A, B, C, D or E?

On the back cover for the external cable connections there is a wiring diagram,
P4(TD_HF and P5(TD_LF). I assume there are the connections for the HF and LF elements in the transducer.
3 COLD
2 N.C.
1 HOT
Does this mean: 3 (COLD) is HF or LF NEGATIVE, 2 (N.C). No Connection, 1 is (HOT) HF or LF POSITIVE? Each element has a positive, negative and shield wire. Where does the shield connect to?

And lastly, how do I connect the water temp sensor on the transducer to the 6 pin connector on the back of the 1150? Is there a ready made "pig tail" that plugs into the 1150 and I can splice it to the transducer cable, and what leads would that be, and to what pins do they connect to? If there is a "pig tail" what is the part number, so I can order it.

I'm sooo confused. Any and all help is greatly appreciated.
Thank you very much.
 
Good morning 808 Double.e,

Thank you for your inquiry.

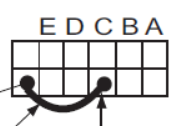
TAP Settings: The Tap Settings for the FCV1150 when using the CM599 LH.
Low: Tap C
High: Tap C

Tap Settings Jumper.png

The CM599LH should have the following wiring colors:
Blue/White: Low Frequency Positive (hot)
Black/WhIte: Low Frequency Negative (cold)
Blue: High Frequency Positive (hot)
Black: High Frequency Negative (cold)
Brown: Temperature
Orange- Not used
White: Temperature
And a couple of Inner Bare wires (shield) wires for both the low and high frequency.

Low Frequency Connector:
Has 3 slots for wires, you will only use #1 and #3.
Low Frequency #1: Blue/White (positive/hot)
Low Frequency #3: Black/White (negative/cold)

High Frequency Connector:
Has 3 Slots for wires, you will only use #1 and #3
High Frequency #1: Blue (positive/hot)
High Frequency #3: Black (negative/cold)

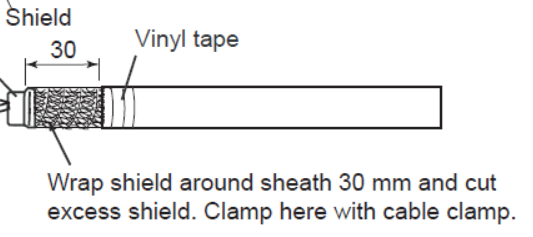
The Shield wires for each frequency: It is very important to ground the frequency shield wires. Typically I will twist them together, put a lug on them and attach them to a screw of the transducer cable clamp piece. If the transducer has an overall cable shield/armor, please expose that and either add this overall shield to the individual frequency shields in the lug connector, or if it is an actual braided armor, fold it back over the vinyl transducer cable and make sure it makes connection to the transducer clamp.

Overall Shield.png

Water Temperature: You will need to get a 6 pin cable to bare wires: Furuno Part # 000-154-054. Connect the wires as follows:

Transducer White (temp) to 6 pin cable Black
Transducer Brown (temp) to 6 pin cable Yellow

You will still need to program the transducer in the transducer setup menu after the wiring is done.

KInd Regards,
C-Bass
 
C-Bass,

Thank you very much for your prompt response and detailed directions. Very much appreciated.

Another question I have is, what is meant when you say: "You will still need to program the transducer in the transducer setup menu after the wiring is done." Is that for the temperature?

I don't have any setup directions that came with the transducer, except on how to install the transducer properly.

Again, any help is greatly appreciated.

Thank you
 
Good afternoon Double808.e,

Once the connection of the transducer has been properly wired to the FCV1150, you will still need to tell the FCV1150 what transducer it is using so it can properly utilize the transducer.

Below is a link to an FCV1150 setup guide for use with a Chirp Transducer. Please follow the steps in the guide that will help you program the FCV1150 to use with the CM599 transducer.

https://www.furunousa.com/-/media/s...fcv295_or_fcv1150_with_a_chirp_transducer.pdf

To access the transducer setup menu: Hold the [Menu} button down while powering the system on. Then choose the following settings.

Please remember that the FCV1150 as specific frequencies that are not available to use:
54-65kHz, 111-139kHz, 171-183kHz.

Which means for High Frequency you will need to make a decision on what bandwidth you want to choose to operate the system. The CM599 has the ability to use frequencies between 130-210 kHz. Due to the lock out frequencies you have to decide if you want to run the high channel above 183Khz or below 171kHz. If you want to run the high channel above 183kHz then choose the following.

XDCR Select: Manual
HF Connection: Connected
Frequency: 200kHz
Band Width. 34kHz
This will allow you to slew the frequency down to 183 khz.

If you want to run the high channel below 171kHz use the following settings.
XDCR Select: Manual
HF Connection: Connected
Frequency: 155
Bandwidth: 30kHz. This will allow the frequency down to 140kHz and up to 170kHz.

Low Frequency:

XDCR Select: Manual
LF Connection: Connected
Frequency: 42kHz
Bandwidth: 21kHz. This will allow you to select frequencies from 31.5kHz to 52.5 kHz.

Please make sure the TX Power is set to 10 and not Auto.

Then power off the machine and start it back up normally.

When the transducer is programmed like this the system will use the Frequency Selected from the transducer setup. For Low Frequency it will be programmed to use 42kHz. On high frequency it will either use 200kHz or 155kHz depending on what way you choose to go in the setup for High Frequency.

Next hit the [Menu] Button.
Then select the {Sounder} menu
Then choose {Frequency Control}

This menu will give you 4 available options to slew the frequencies that you want to use.
For High Frequency: I prefer to use 200kHz for shallow water fishing over structure or wrecks up to about 600ft. Your Forum Name is 808 so I have to assume your in the great islands in the Pacific, Aloha Brother! 200kHz might be usefull for when your fishing structure, it gives a narrow beam angle which is good for holding over structure.

For Low Frequency, if you plan on trolling for the pelagics: Tuna, Marlin etc I would choose something around 32-35kHz. That will give you a nice sweet spot on with the 599, good returns and wider beam angle for covering water. You can also program the other low frequency option to 50kHz or any other number if you choose. When you use the cursor pad to slew the frequency, when you have selected the frequency that you want hit the enter button.

Then hit the [Menu] button again to back out to the {Sounder} menu. Then choose Frequency Choice: The frequency choice will allow you to choose the frequencies that you performed in the frequency control menu. Choose the frequency for the high and low channel that you want to use. Then the low frequency will use the frequency that you just chose and the high frequency will use the high frequency that you chose.

Hope that helps. If you have any trouble you can always call our tech support line and they can help walk through the steps.

Hopefully you make up some choice Poke with all the fish you catch!

Also a link below to the FCV1150 Operator's Manual for your review.

https://www.furunousa.com/-/media/s...peration_manuals/fcv1150_operators_manual.pdf

Aloha
C-Bass.
 
Thank you again, C-Bass for the detailed directions
for setting up the 1150. Yes, you're right. I'm from
the beautiful State of Hawaii. Aloha to you too.

Got another question for you.

Does the "SHIELD" wire that's with the Brown and White
wire bundle, for temperature, need to connected to the
6 pin cable, and if so, what color wire does it go to? Or
does it need to be connected to the shields for the
HI and LOW elements, or it doesn't need to be connected
at all?

Transducer White (temp) to 6 pin cable Black
Transducer Shield (temp) to ????
Transducer Brown (temp) to 6 pin cable Yellow

Thank you again for all of your help. It is greatly appreciated.
 
Good morning 808,

I try to keep all the drain wires going to the same location.

C-Bass
 
Is there a way to turn off the output from the 1150 to the transducer while configuring the settings? Or just not connect the transducer when doing the configuration? There was a note on the transducer instructions saying not to run the transducer out of water, because it will overheat. The boat is a trailer boat, so the transducer will be out of the water when doing the settings.

Thank you
 
808double.e,
The sounder doesn't transmit when it is in the transducer set-up menu.

Snips
 
Thank you Snips.

Can the output of the 1150 be turned off at all? Like when its removed from the boat, and connected to a DC power supply, at my house, while trying to manipulate other settings. Will the 1150 get damaged if its run without a transducer connected?
 
808double.e,
The FCV-1150 has a very nice demo mode you can use and it won't transmit during this time.
You access the demo mode the same way you access the transducer set-up menu.

Snips
 
Just saw a previous posting for connecting the temp sensor to the 6 pin NMEA cable for a 295.

BROWN xdcr wire to pin 2 BLACK on 6 pin cable
WHITE xdcr wire to pin 3 YELLLOW on 6 pin cable

-------------------------------------------------------------------------------------------------------------------------------

I ordered this cable,
Furuno Part # 000-154-054. NMEA 6 pin cable, and was going to connect it like this:

Transducer White (temp) to 6 pin cable Black
Transducer Brown (temp) to 6 pin cable Yellow

Can anyone confirm which is the correct wiring? I think both are supposed to be the same, as far as connecting the temp sensor.

Thank you.
 
808double.3,
Yes that will work.
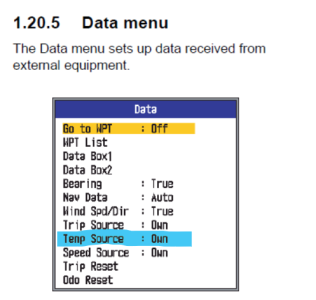
You also will need to program the FCV-1150 to look for the temp sensor instead of a NMEA input.

Snips
 
808-

In the menu choose the {Data} you will see an option the says "Temp Source" make sure it says "Own."
Temp Source.png
 
Thank you Snips.

What frequency and bandwidth should the 1150 be set at, to cover from 28 Khz to 53.5 Khz? Is that even possible on the 1150?

Thank you
 
808double.e.,
If you set the LF frequency at 42Khz you we be able to set the band width at 21Khz. This will allow you slew the frequency from 31.5 to 52.5khz. I think you will find the best performance will be close to 38Khz. If you want to try a lower range try setting the center frequency at 38Khz and the BW at 19Khz.

Snips
 
Thanks Snips.

Does the GRND screw on the back of the 1150 need to be tied into the boats main ground? For example, attach it, to the engine block, where all the batteries negatives are tied in.

Thank you
 
808double.e,
In most cases you don't have to ground the case of an 295/1150. If you encounter noise, the first thing to do is to make sure that the shields on the transducer cables are going to the metal cable clamp. It you still see noise you may try running a ground wire to the grounding stud on the back of the sounder. However on some vessels the DC negative is not the same as the vessels bonding/earth ground.

Snips
 
Back
Top